Team Win Recovery Project(TWRP) is a one type of open source software
for Android based device. TWRP gives users the chance to fully back up
their device to revert to at any time. TWRP supported the installation
of custom ROMs, kernels and other mods. With it's impressive GUI & functions, TWRP recovery makes it easy to root and unroot your Android phone, Flash custom roms made available for your phone, Flash any img file, Easy restore and backup of your device and many more.
(2) Android USB Drivers: Download
(3) ADB and Fastboot: Download and Extract
(4) A Laptop or PC
(5) A fully charged phone or at least 70%
(6) Back up your Android Phone (Recommended)
(7) Brain!
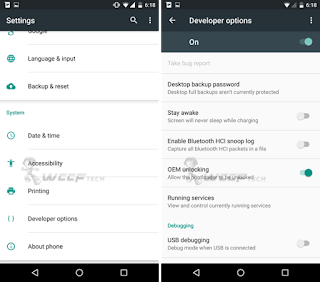
On your Android phone, Navigate to Settings>> About Phone >> Scroll down to Build Number >>Tap it 7 times to enable Developer Options (You see a toast message “Developer option enabled” or "You are now a Developer!".). Now navigate back to Developer options to enable USB Debugging.
(2) Now in your PC/Laptop, Open the extracted ADB Folder and open the Command Window
(3) Now connect the Android Phone to PC with a USB Cable.
(4) Reboot your phone into Bootloader, To reboot, type the following command from below in your Command window you opened earlier
adb reboot bootloader
(5) Now type the below command in your command prompt window
(6) For flashing TWRP recovery, Type this command. First make sure that the name of TWRP image, if you renamed it to recovery.img, then after the flash recovery, type recovery.img
You have successfully installed TWRP recovery on your phone using the fastboot method. Now you can go on and flash any custom rom of your choice(made available for your phone), backup and restore and also flash Magisk or SuperSU to enjoy admin privilege on your Android device.
PREREQUISITE :
(1) SP Flash Tool: Download and Extract it(2) Android USB Drivers: Download
(3) ADB and Fastboot: Download and Extract
(4) A Laptop or PC
(5) A fully charged phone or at least 70%
(6) Back up your Android Phone (Recommended)
(7) Brain!
Steps for Flashing TWRP Recovery on your Android Phone
(1) Enable USB Debugging
Steps:On your Android phone, Navigate to Settings>> About Phone >> Scroll down to Build Number >>Tap it 7 times to enable Developer Options (You see a toast message “Developer option enabled” or "You are now a Developer!".). Now navigate back to Developer options to enable USB Debugging.
(2) Now in your PC/Laptop, Open the extracted ADB Folder and open the Command Window
(3) Now connect the Android Phone to PC with a USB Cable.
(4) Reboot your phone into Bootloader, To reboot, type the following command from below in your Command window you opened earlier
adb reboot bootloader
fastboot devicesBy typing this command, you can see the list of connected device. If your phone serial number shows up you are good to go and may continue. If the phone is NOT listed this indicates that your drivers are not installed correctly. You must fix your drivers so that your phone is listed under fastboot device.
(6) For flashing TWRP recovery, Type this command. First make sure that the name of TWRP image, if you renamed it to recovery.img, then after the flash recovery, type recovery.img
fastboot flash recovery recovery.img
You have successfully installed TWRP recovery on your phone using the fastboot method. Now you can go on and flash any custom rom of your choice(made available for your phone), backup and restore and also flash Magisk or SuperSU to enjoy admin privilege on your Android device.


No comments:
Post a Comment